Importing Data
Earlier, we described workfile creation tools that allow you to open data from foreign sources into a
new workfile (
“Creating a Workfile by Reading from a Foreign Data Source”). This is most likely the easiest way to move data from foreign files and database sources such as ODBC into EViews and we recommend it as your first approach, but you should note that these tools are expressly designed for creating new workfiles.
Alternatively, you may wish to import data into an existing workfile, perhaps into existing series in the workfile—you may, for example, wish to read a portion of an Excel file into a subset of observations in a series or group of series. We term the reading of data into existing workfiles and/or series importing series data to distinguish it from the creation of entirely new workfiles and series.
There are several methods for importing series data into EViews. In the remainder of this discussion, we outline the basics of data import from spreadsheet, text file, or printed formats, into series and group objects. Note that we omit, for the moment, discussion of importing data into EViews matrix, vector and pool objects, and discussion of EViews and foreign databases:
Entering Data
For small datasets in printed form, you may wish to enter the data by typing at the keyboard.
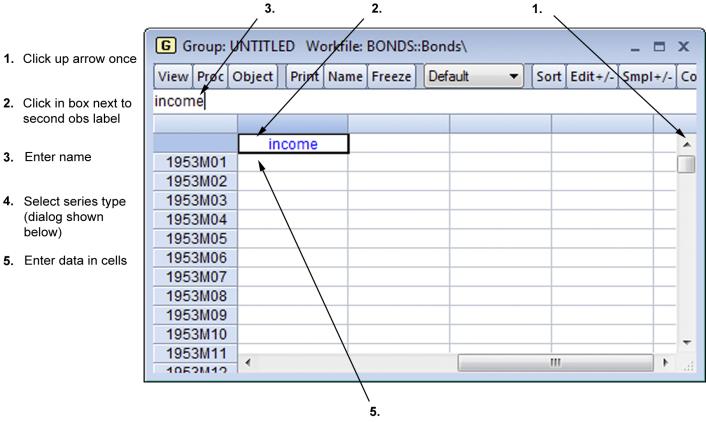
• Your first step is to open a temporary spreadsheet window in which you will enter the data. Choose from the main menu to open an untitled group window:
• The next step is to create and name the series. First click once on the up arrow in the scroll bar to display the second label on the left-hand column. The row of cells next to the second label is where you will enter and edit series names.
Click once in the cell next to the second label, and enter your first series name. Here we have typed “income” in the edit window (the name in the cell changes as we type in the edit window). Press RETURN. If you enter the name of an existing series, the series data will be brought into the group.
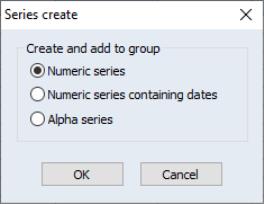
• EViews will prompt you to specify a series type for the column. You may select a numeric series, numeric series containing date values, or an alpha series. When you click on , EViews will create a numeric or alpha series and will apply formatting information that will aid you in viewing your data.
• You should repeat this procedure in subsequent columns for each additional series. If you decide you want to rename one of your series, simply select the cell containing the series name, edit the name in the edit window, and then press RETURN. EViews will prompt you to confirm the series rename.
• To enter the data, click on the appropriate cell and type the number or text. Pressing RETURN after entering the cell value will move you to the next cell. If you prefer, you can use the cursor keys to navigate the spreadsheet.
• When you are finished entering data, close the group window. If you wish, you can first name the untitled group by clicking on the button. Otherwise, if you do not wish to keep the group, answer when EViews asks you to confirm the deletion.
Copying-and-Pasting
The Windows clipboard is a handy way to move small amounts of data within EViews and between EViews and other software applications. It is a natural tool for importing these types of data from Excel and other Windows applications that support Windows copy-and-paste.
Copying from Windows Applications
The following discussion involves an example using an Excel spreadsheet, but the basic principles apply for other Windows applications.
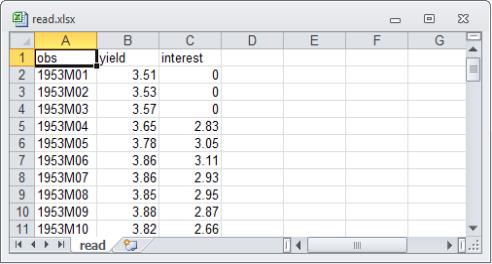
Suppose you have bond yield and interest rate data in an Excel spreadsheet that you would like to bring into EViews.
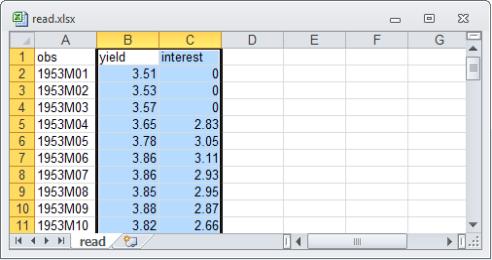
Open the spreadsheet in Excel. Your first step is to highlight the cells to be imported into EViews. Since the column headings YIELD and INTEREST will be used as EViews variable names, you should highlight them as well. Since EViews understands dated data, and we are going to create a monthly workfile, you do not need to copy the date column. Instead, click on the column label B and drag to the column label C. The two columns of the spreadsheet will be highlighted.
Select to copy the highlighted data to the clipboard.
Pasting into New Series
Start EViews and create a new, or load an existing, monthly workfile containing the dates in the Excel spreadsheet (in our example, 1953m01 through 1994m11). Make certain that the sample is set to include the same observations that you have copied onto the clipboard.
Select . Note that the spreadsheet opens in edit mode so there is no need to click the button.
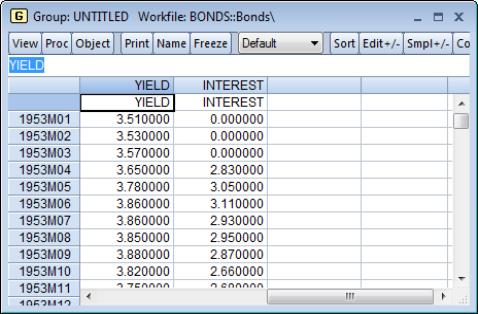
Here, we have created a monthly workfile with a range from 1953:1 to 1999:12. The first row of the EViews spreadsheet is labeled 1953:01. Since we are pasting in the series names as well, you should click on the up arrow in the scroll bar to make room for the series names.
Place the cursor in the upper-left cell, just to the right of the second label. Then select from the main menu (not in the toolbar). The group spreadsheet will now contain the data from the clipboard.
EViews automatically analyzes the data on the clipboard to determine the most likely series type. If, for example, your series contains text that can always be interpreted as a number, EViews will create a numeric series. Here, the numeric series YIELD and INTEREST have been created in the workfile.
If the numbers in the series may all be interpreted as date values, or if the data are all string representations of dates, EViews will create a numeric series formatted to display dates.
If you paste a name corresponding to an object that already exists in the workfile, EViews will find the next available name by appending an integer to the series name. For example, if SER already exists in the workfile, pasting the name “SER” will create a series SER01.
You may now close the group window and delete the untitled group without losing the two series.
Pasting into Existing Series
You can import data from the clipboard into an existing EViews series or group spreadsheet by using in the same fashion. There are only a few additional issues to consider:
• To paste several series, you will first open a group window containing the existing series. The easiest way to do this is to click on , and then type the series names in the order they appear on the clipboard. Alternatively, you can create an untitled group by selecting the first series, holding down the -key and click select each subsequent series (in order), and then double clicking to open.
• Make certain that the group window is showing the sample range that corresponds to the data on the clipboard.
• Next, make certain that the group window is in edit mode. If not in edit mode, press the button to toggle to edit mode. Place the cursor in the target cell, and select from the main menu.
• Finally, click on to return to protected mode.
• If you are pasting into a single series you will need to make certain that the series window is in edit mode, and that the series is viewed in a single column. If the series is in multiple columns, push on the button. Then the data as usual, and click on to protect the data.
Linking pasted data
When pasting data into EViews, either as a new workfile, or into an existing workfile, EViews will ask if the new series objects should be linked back to the source. Click to mark the new series objects as externally linked. Linked objects can be refreshed with updated data when the workfile is next opened, or on demand by right-clicking on the workfile window and selecting or by clicking on in the main menu to display the link management dialog.
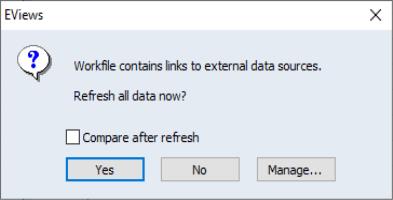
When you next open your existing workfile containing linked data, EViews will prompt you to refresh the data, and optionally, to display a comparison of the data before and after the refresh:
Importing Data
EViews provides easy-to-use tools for importing data into an existing workfile, matching observations between the source and destination as required. The source data may be available in any of a number of data formats, from one of the EViews supported foreign file formats (i.e., Microsoft Excel, ASCII text, SPSS, SAS portable, Stata, etc.), to an EViews format workfile.
Opening the Source File
To use the import tools, first, make certain that you have an open workfile to receive the contents of the data import and that the workfile window is active, then click on or click on the menu of the workfile and select In either case, EViews will display a standard file dialog.
Next, type the name of the file you wish to read (with full path information, if appropriate) or select a file type, navigate to the directory containing the file, and double click on the name. Click on the button to continue.
(Alternately, you may simply drag-and-drop the source file onto the open workfile window.)
EViews will open the file (automatically determining the file type, if possible, or interpreting the file as ASCII text, if not). Next, EViews may display a set of dialogs prompting you for information about the structure of the data you are reading. These dialogs are identical to those encountered when you open a file as a new workfile (see
“Creating a Workfile by Reading from a Foreign Data Source”). Fill out the dialogs appropriately, clicking on at each step.
Once you have described the file and data, EViews will display a dialog prompting you for details on how you wish to perform the import of data:
There are two parts to the import specification: the choice of import method and the setting of various import options.
In the top-left portion of the dialog is the dropdown, which controls how the source data will be read into the existing workfile. The area to the right of the dropdown will change to show options associated with the currently selected method.
Directly below the dropdown is the section, which offers access to settings for renaming series and specifying frequency conversion methods. Additionally, depending on the precise form of your import, you may be presented with additional dialogs for resizing the destination workfile or choosing how to handle import name conflict.
The bottom portion of the dialog consists of an import preview display, which shows a sample of destination observations along with corresponding data from the source file. The preview will change along with your selected import method specification.
We discuss all of these settings and choices below.
Import Method
The central question in importing data is how to relate observations in the source file to observations in the destination workfile. The dropdown at the top left of the dialog should be used to specify the desired method. Depending upon the structure of the destination workfile, you will be asked to select between four or five import methods: (only if destination workfile is dated), , , , and .
Each method has a variety of associated settings, so we consider each in turn.
Dated Read
You may perform a dated read if the destination workfile is a dated (or panel dated) workfile. In a dated read, observations in the source file are matched by date to observations in the current workfile page, with frequency conversion performed if necessary. The concepts underlying dated reads are identical to those in creating links between two dated workfile pages, as outlined in
“Linking by date with frequency conversion”.
To perform a dated read you must first specify the date structure of the source workfile. Accordingly, when you select in the dropdown, the upper portion of the dialog will change to show you date settings for the data to be imported.
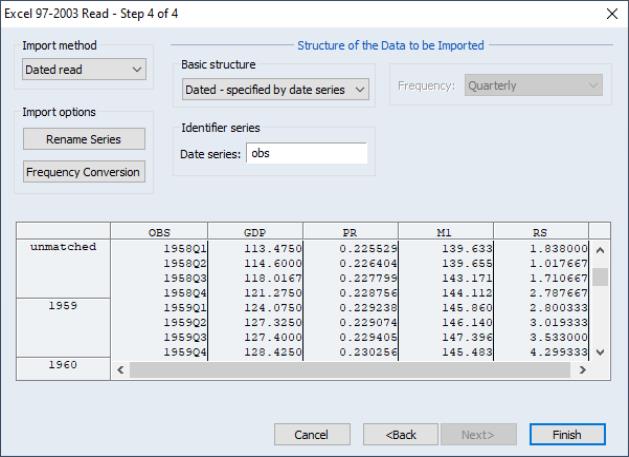
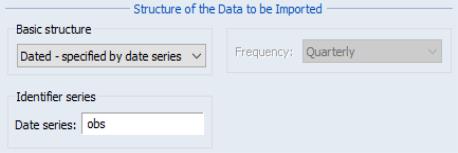
When the source file is first opened for dated read, EViews will attempt to identify a date series in the file (i.e. a column of data containing dates), and to determine the date frequency of those dates. If a source date series is located, the dropdown will be set to and the source name will be entered in the edit field. If no date series is identified, the import file data structure will be set to match the destination.
Altering the specified date structure changes the nature of the import since it affects the matching of observations between the source and destination. To aid you in visualizing the effect of this setting, the left-hand column of the data preview display updates with changes in the structure to show you the current date matching settings:
Here, we see that the source observation with OBS value 1959Q1 is matched with the workfile destination observation 1959M1 and that the source observation with OBS=1959Q2 is matched with the destination observation 1959M4. Note that there are no matches for the source observation OBS=1958Q4 since the destination workfile begins in 1959.
If we were instead importing into an annual file, the bottom portion of the display would change to
depicting the matching of quarterly observations in the source file with annual observations in the destination workfile.
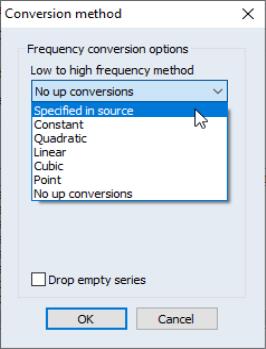
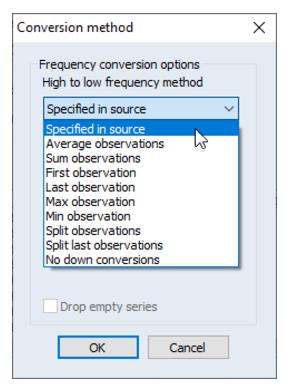
In both of these examples, importing of the data into the page requires frequency conversion. To control the frequency conversion method, you may click on the on the left-hand side of the page to bring up the conversion settings.
You will presented with a set of choices for either high-to-low or low-to-high frequency conversion methods, depending on the situation. By default, EViews will use the method specified in the destination series (or the global defaults, if the destination series does not yet exist).
In both cases, you may choose to drop series in the source file which have no data by clicking on the checkbox. Similarly, you can disallow frequency conversion entirely using the or selection.
When converting from high-to-low using a specific method such as , you will be given the option of selecting the checkbox (hidden here underneath the dropdown) so that the low frequency data will be set to missing if there are missing data for a corresponding high frequency period.
Click on to close the dialog and accept the conversion method.
In most cases, EViews will have correctly identified the date series so that the default settings will require no change. Click on the button complete the import specification and instruct EViews to begin the import procedure.
EViews will now ask if the new series objects should be linked back to the source. Click to mark the new series objects as externally linked. Linked objects can be refreshed with updated data when the workfile is next opened, or on demand by right-clicking on the workfile window and selecting or by clicking on in the main menu to display the link management dialog.
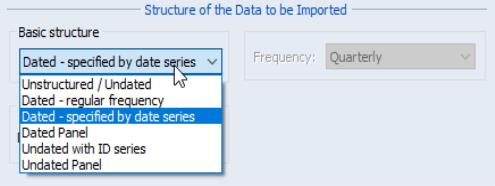
You may, if desired, override the default EViews date specification settings by changing the dropdown menu to one of the alternative methods, and then using the remaining settings to specify the data frequency.
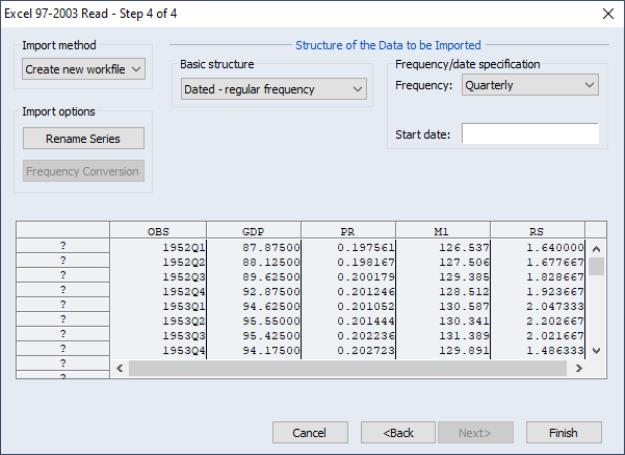
For example, if you select in the dropdown, the dialog changes to reflect the new settings:
Notice that EViews no longer shows the date series under , instead prompting you to provide a using the dropdown menu and the edit field. EViews will assume that the source file has sequential observations of the given frequency beginning in the specified date.
Since we have not yet specified a , the “?”s in the observation preview at the bottom of the dialog indicate that the observation matching is indeterminate. Once a start date is specified, the display will be updated to depict matching observations.
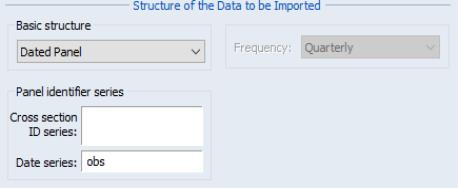
If the destination workfile is panel structured, you may instead choose in the dropdown.
When is selected, the import structure section of the dialog changes, prompting you to specify a and a . If you continue with the import, EViews will perform the date and ID matching as specified.
Matched Read
The method performs a general match-merge between the data in the source file and the current workfile page. The concept is outlined in detail in
“Linking by general match merging”.
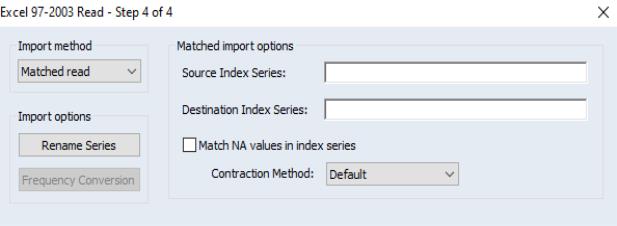
To perform a matched read import, change the dropdown to , then specify the and corresponding that will be used as define observation matches. In many cases, EViews will suggest likely values for the match indices determined by examining the contents of the source file and destination workfile.
Suppose for example, that your destination workfile has data on unemployment rates in each of the EU countries, you might have an identifying series called “COUNTRY” containing the country names. If you have a corresponding series in the source file, called “NATION,” that also contains country names, then you would specify “NATION” as the source index, and “COUNTRY” as the destination index. Note that the observations in the source index need not be in the same order as they are in the destination.
In the simplest case, your index series will contain identical observation identifiers that can be used to match up the observations in the two files. If the matches are one-to-one or if there are multiple destination matches for every source observation (one-to-many), EViews will simply perform the merge in the obvious fashion, repeating source observations for every destination observation if necessary.
If, however, the matching is many-to-one so that there are multiple source observations for a given destination observation, EViews will contract the source data before performing the match merge. You may control the contraction method using the dropdown.
Suppose, for example, that your destination workfile contains a series COUNTRY containing the identifiers for “Mexico,” “Canada,” and “US”, your source file contains U.S. state level data. You should enter COUNTRY as your and indicate that your source should be matched with the “US” destination observation. (In the likely event that the source file does not have a COUNTRY series, you can create an auto-series by typing “US”, with the quotes, in the box.) Note that in this case, the state level data must first be contracted (summarized) before it is matched to the “US” observation in the destination. To contract the source data by taking the sum of the states as a value for “US”, you would set the to .
The last dialog setting, , should be checked if you want to treat the NA value as a distinct category for purposes of defining matches.
The observation preview in the bottom of the dialog may be used to assess the validity of your source and destination index specifications.
Sequential Read
A sequential import uses no information on the structure of the source data, it simply places each observation in the source file into the corresponding observation of the destination workfile. Thus the first row of the source file will be placed in the first observation of the destination, the second row will be placed in the second observation, and so on.
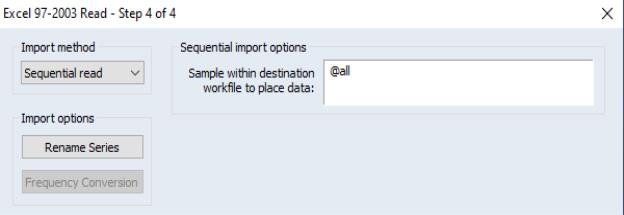
For a sequential read, simply select in the dropdown. There is only one setting; you may specify a destination sample in which to place the data, so that the first observation of the source file will be placed into the first observation of the specified sample, the second source observation will be placed in the second sample observation, and so on.
As before, the observation preview in the bottom of the dialog may be used to preview the destination for some of the source observations.
Append to End
The import method appends each row of the source file to the end of the destination workfile. The existing workfile structure will be removed.
For example if your destination workfile is an annual file running from 1990 - 2000, and the source file contains 5 rows of data, the import will place the 5 rows of data at the end of the workfile, leaving you with an unstructured 16 observation workfile.
Create New Page
The method creates a new page in your workfile and reads the source file into that new page. This form of data import is identical selecting in the workfile window or clicking on the tab and selecting For additional detail, see
“Creating a Page by Loading a Workfile or Data Source”.
Importing Attributes
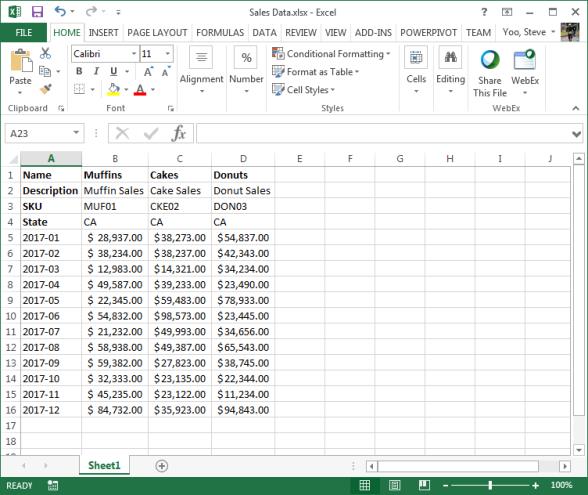
Support for reading in custom series attributes (along with the series data) specified as header rows during an import from Excel and text files was introduced in EViews 10. For example, the following Excel spreadsheet has custom attributes for Description, SKU, and State specified in header rows:
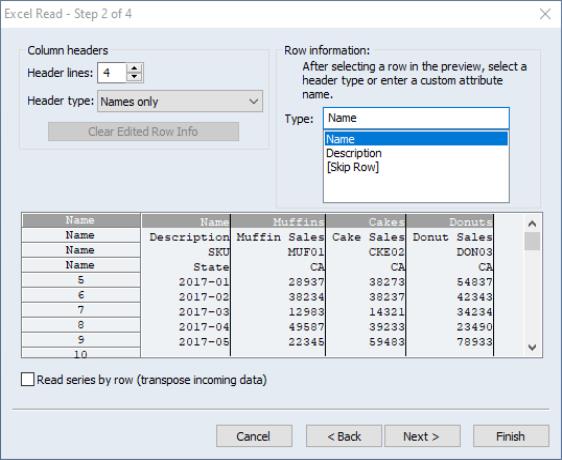
When we drag and drop this file onto EViews, the new Import Wizard dialog appears. On the second page (Step 2), you may change how each header row is used:
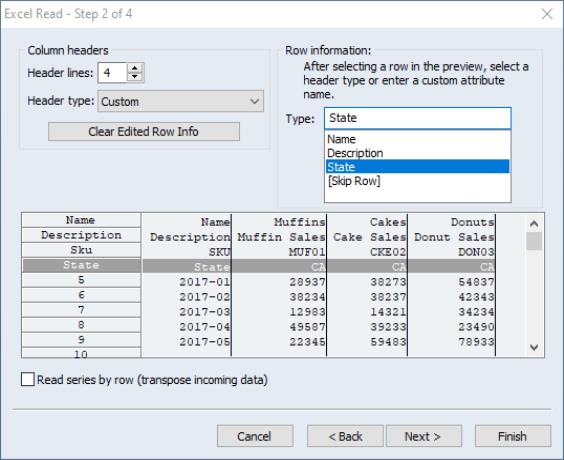
By default, EViews will treat every header row as a Name field, but you can change the row type for each header by selecting (or specifying a custom value for) the attribute name:
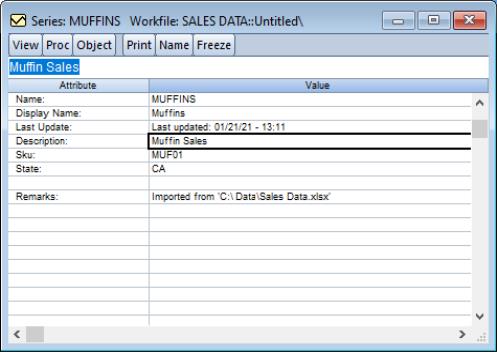
You can now complete the import and verify that all custom attributes have been read in correctly:
Both the
wfopen and
import commands have been modified to support new values for the "namepos=" argument and a new "colheadnames=" argument to specify individual attribute names for each column. See
wfopen for more details.
Import Options
The sections of the dialog consists of two buttons: and .
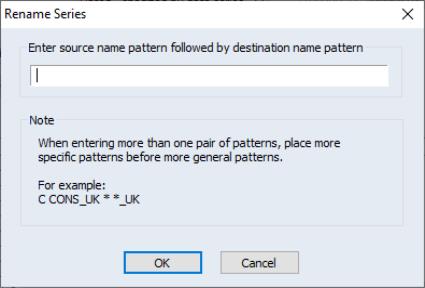
Pressing the button brings up a dialog that allows you to rename some of the imported series to different names. Renaming the series on import allows you to handle illegal input series names, and to avoid name conflicts with existing series.
The button, which brings up a dialog that controls the high-to-low and low-to-high frequency conversion methods, is enabled whenever you are performing a dated import. See
“Dated Read” for discussion.
Import Workfile Resizing
When you import data from a source file that contains observations for which there are no destination workfile matches, EViews will prompt you to accommodate the data by resizing the destination.
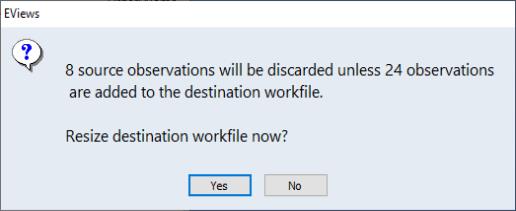
If, for example, your original workfile has observations from 1990M01 to 1994M12 and you import quarterly data for 1990Q1 to 1996Q4, EViews will determine that there are no destination observations corresponding to the source observations for 1995Q1 to 1996Q4. When you proceed with the import, EViews will display a dialog informing you of this fact.
There are two ways to proceed. First, you may click on to resize the destination workfile, adding 24 monthly observations for 1995 to 1996. The merge will then proceed using all of the data in the source.
Alternately, you may click on to retain the original destination workfile range. In this case, the 8 observations in the source file for 1995Q1 to 1996Q4 will be discarded on import, and will not appear in the final destination workfile.
Import Name Conflict
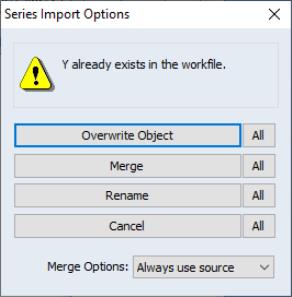
If you select an import method that brings source data into the current workfile page, and the source file contains series with the same name as an existing series, EViews will display a dialog asking how you wish to handle the conflict.
You may choose to overwrite the existing series object (which will delete the existing series and replace it with the source data), to merge the two series, to rename the incoming series, or to cancel the import of the series. Clicking on the button performs the corresponding operation for all cases where there is conflict.
If you choose to the source and destination series, EViews will use the dropdown settings to determine how to join the data:
• will overwrite the destination series values for all observations in the source file, including observations where the source contains an NA.
• will overwrite the destination series views with those from the source file, excluding observations where the source contains an NA.
• will only overwrite an observation in the destination file if its existing value is an NA.
Note that whatever the merge settings, observations in the destination workfile that are not also in the source file will be unchanged.
Matrix and Table Object Import
The preceding discussion focused on importing data into series or group objects. Similar tools are available for importing data directly into a matrix or table object from external data.
