Assigning Matrix Values
There are three ways to assign values to the elements of a matrix: you may assign values to specific matrix elements, you may fill the matrix using a list of values, or you may perform matrix assignment.
Element assignment
The most basic method of assigning matrix values is to assign a value for a specific row and column element of the matrix. Simply enter the matrix name, followed by the row and column indices, in parentheses, and then an assignment to a scalar value.
For example, suppose we declare the

matrix
A:
matrix(2,2) a
The first command creates and initializes the

matrix
A so that it contains all zeros. Then after entering the two commands:
a(1,1) = 1
a(2,1) = 4
we have
 | (11.1) |
You can perform a large number of element assignments by placing them inside of programming loops:
vector(10) y
matrix (10,10) x
for !i = 1 to 10
y(!i) = !i
for !j = 1 to 10
x(!i,!j) = !i + !j
next
next
Note that the
fill procedure provides an alternative to using loops for assignment (see, for example, the matrix object version of the procedure,
Matrix::fill).
Fill assignment
The second assignment method is to use the fill object procedure to assign a list of numbers to each element of the matrix in the specified order. By default, the procedure fills the matrix column by column, but you may override this behavior to fill by rows.
You should enter the name of the matrix object, followed by a period, the fill keyword, and then a comma delimited list of values. For example, the commands:
vector(3) v
v1.fill 0.1, 0.2, 0.3
matrix(2,4) x
matrix.fill 1, 2, 3, 4, 5, 6, 7, 8
create the matrix objects:
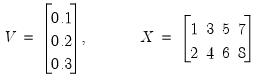 | (11.2) |
If we replace the last line with
matrix.fill(b=r) 1,2,3,4,5,6,7,8
then X is given by:
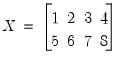 | (11.3) |
In some situations, you may wish to repeat the assignment over a list of values. You may use the “l” option to fill the matrix by repeatedly looping through the listed numbers until the matrix elements are exhausted. Thus,
matrix(3,3) y
y.fill(l) 1, 0, -1
creates the matrix:
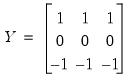 | (11.4) |
See
Matrix::fill for a complete description of the fill procedure for a matrix. Equivalent procedures are available for the remaining matrix objects.
Matrix assignment
You can copy data from one matrix object into another using assignment statements. To perform an assignment, you should enter the name of the target matrix followed by the equal sign “=”, and then a matrix object expression. The expression on the right-hand side should either be a numerical constant, a matrix object, or an expression that returns a matrix object.
There are rules for how EViews performs the assignment which vary depending upon the types of objects involved in the assignment.
Initialize to Scalar Value
If there is a scalar on the right-hand side of the assignment, every element of the matrix object is assigned the value of the scalar.
Examples:
matrix(5,8) first
scalar second
vec(10) third
first = 5
second = c(2)
third = first(3,5)
Since declaration statements allow for initialization, you can combine the declaration and assignment statements. Examples:
matrix(5,8) first = 5
scalar second = c(2)
vec(10) third = first(3,5)
Initialize Using Compatible Matrix
If the source object on the right is a matrix or vector, and the target or destination object on the left is of the same type, the target will be resized to have the same dimension as the source, and every source element will be copied. For example:
matrix(10,2) zdata = 5
matrix ydata = zdata
matrix(10,10) xdata = ydata
declares that
ZDATA is a

matrix filled with 5’s. In the second line,
YDATA is automatically resized to be a

matrix and is filled with the contents of
ZDATA.
The third line declares and initializes XDATA. Note that even though the declaration of
XDATA calls for a

matrix,
XDATA is a

matrix of 5’s. This behavior occurs because the declaration statement above is equivalent to issuing the two commands:
matrix(10,10) xdata
xdata = ydata
which will first declare the

matrix
XDATA, and then automatically resize it to

when you fill it with the values for
YDATA (see also
“Copying Data From Matrix Objects”).
The matrix object on the right hand side of the declaration statement may also be the output from a matrix function or expression. For example,
sym eye4 = @identity(4)
declares the symmetric matrix EYE4 which is equal to the

identity matrix, while
vector b = @inverse(xx)*xy
inverts the matrix XX, multiplies it by XY, and assigns the value to the new vector B.
The next section discusses assignment statements in the more general case, where you are converting between object types. In some cases, the conversion is automatic; in other cases, EViews provides you with additional tools to perform the conversion.
Initialize Using Creation Functions
One common operation, creating and filling a vector in one-step may be accomplished using some specialized functions for creating specific types of vectors:
• @fill(n1, n2, n3, ...) – returns a numeric vector with the specified values.
• @range(n1, n2) – returns a numeric vector with the sequential integer values from n1 to n2.
• @seq(s, d, n) – returns a numeric vector with the arithmetic sequence of n elements beginning with s and incrementing by d.
• @seqm(s, d, n) – returns a numeric vector with the multiplicative sequence of n elements beginning with s and incrementing by by the factor d.
• @grid(n1, n2, n3) – returns a numeric vector containing a grid of n3 values from n1 to n2.
• @unit(n1, n2, n3) – returns a numeric vector containing a grid of n3 values from n1 to n2.
• @ones(n1) – returns an n1 element vector of ones.
• @zeros((n1) – returns an n1 element vector of zeros.
• @unitvector(n1, n2) – returns an n1 element vector with a 1 in the n2-th element, and 0 elsewhere.
• @filledvector(n1, n2) – returns an n1 element vector filled with n2.
• @filledrowvector(n1, n2) – returns an n1 element row vector filled with n2.
• @sfill("str1", "str2", "str3", ...) – returns a svector using the specified double-quote enclosed strings.
• @wsplit("str1") – returns a svector by splitting the string into words.
Note that the all but the last two functions creates a vector object, while those two create an svector (string vector) object.
These use of these functions are straightforward. While @fill and @seq will work with arbitrary numeric values, one important application is in generating vectors of integer values.
vector x1 = @fill(1, 2, 4, 5, 7)
creates the vector with elements {1, 2, 4, 5, 7}, while
vector x2 = @range(1, 5)
creates the vector with elements {1, 2, 3, 4, 5}, while
vector x3 = @seq(1, 2, 4)
creates the vector with elements {1, 3, 5, 7}, while
vector x4 = @grid(1, 2, 6)
creates the vector with elements {1.0, 1.2, 1.4, 1.6, 1.8, 2.0}, and
svector sx1 = @sfill("apple", "pear", "orange")
creates the svector with the values {“apple”, “pear”, “orange”}.
Since these functions both create and initialize the vector, they are often used to provide inputs to other functions:
scalar pythagoras = @sum(@range(1, 6))
Similarly, other commonly employed functions create and fill a matrix:
• @ones(n1, n2) – return an n1 by n2 matrix of ones.
• @zeros(n1, n2) – return an n1 by n2 matrix of zeros.
• @identity(n1) – return an n1 by n1 symmetric identity matrix.
• @filledmatrix(n1, n2, n3) – return an n1 by n2 matrix filled with n3.
• @filledsym(n1, n2) – return an n1 by n1 symmetric matrix filled with n2.
While a matrix of ones may be created using either
matrix(10, 3) ones1 = 1
matrix ones2 = @ones(10, 3)
the latter is most useful for providing the matrix as an input to a second function
matrix k = @kronecker(@identity(10), @ones(10, 3))
Similarly, while you may create a vector with the value Pi using
vector(10) pimat = @pi
the filled vector function is useful for creating input for a function that requires a vector
matrix g = @hcat(@ones, @filledvector(10, @pi))
without explicitly declaring PIMAT.