Appending to a Workfile
One method of combining two workfile pages is to append observations from a source workfile page to the end of a target workfile page. When appending data, EViews first removes any structure from the target page, then expands its range to encompass the combined range of the original page and the appended data. The data from the source page are then copied to the expanded part of the target workfile range, either in existing series or alpha objects, or in newly created objects.
When appending, you should first make certain that the workfiles containing both the source and target page are open in EViews. In some cases (for example, concatenating a workfile page with itself), you only need to have a single open workfile since the source and target workfiles are the same.
To open the dialog, click on the button on the target workfile toolbar and select , or select from the main menu.
Selecting Data to Append
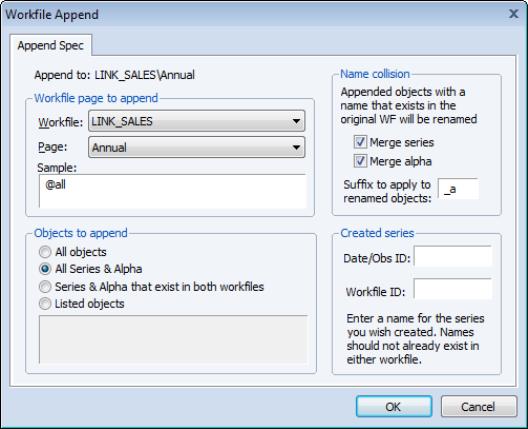
You should begin by selecting a workfile page containing data to be appended to the target page. The first dropdown menu contains a list of all workfiles currently in memory from which you should select the source workfile; in the second dropdown menu, you should choose a page from those in the workfile you have selected. Here, we have instructed EViews to append data from the ANNUAL page in the workfile LINK_SALES.
Next, you should specify a sample of observations in the source page to be appended; any valid EViews sample may be provided. Here, we have specified the default sample “@ALL”, which ensures that we use all of the observations in the source page.
If you wish, you may use the settings to specify the objects to be appended or copied. By default (), EViews will append all series and alphas (and links) from the source page into the destination page. If you select EViews will append all series and alphas, and will copy all other objects into the destination. Alternatively, choosing allows you to specify the individual objects to be copied by name, using wildcards if convenient. To append only those data objects that exist in both pages, you should select . If this setting is selected, a series or numeric link Y in the source page will only be appended if a series Y exists in the active page, and an alpha or alpha link X in the source will only be appended if an alpha series X exists in the destination.
Handling Name Collision
The settings in control the method EViews uses to append data when a source object name is present in the target page. To understand the effects of the various settings, consider the three possible scenarios that may occur when appending from an object into a workfile page:
• there is no object with the same name in the target page.
• an object with the same name exists in the target, but the object type is not compatible.
• an object with the same name exists in the target, and the object type is compatible with the source object.
In saying that the source and destination objects are compatible, we indicate that the source data may be added to the end of the existing object. Series and numeric link data may only be added to the end of series objects, while alpha and alpha link data may only be added to the end of alpha objects. All other combinations of objects are said to be incompatible.
Suppose that we wish to append the source series X or numeric link to the target page. If there is no object with the same name in the target page, EViews will create a new series, X, containing NA values for the original target page observations, and the values of the source series X for observations in the expanded part of the range.
If there is an incompatible matching object, a new object will be created with a name formed from the original name and the text specified in the edit field. If, for example, the target page contains an incompatible X (e.g., it contains the equation X), EViews will create a new series using the original name, and the specified suffix, for example, “X_A” (using the default suffix, “_A”).
If there is a compatible matching object, EViews will examine your dialog settings to determine the appropriate behavior. By default, EViews will append the data from a compatible source object to the end of the existing object. Thus, data from the series or numeric link X will be copied to the expanded part of the range of the target series X, and data from the alpha or alpha link Y will be copied to the end of the alpha series Y. You may override this default so that EViews creates a new object even when the matching objects are compatible, by unselecting the or checkboxes.
Creating Identifier Series
The optional settings in the dialog allow you to save series containing information about each observation in the combined workfile.
To save a series containing the date or observation ID associated with each observation in the combined workfile, you should enter a unique name in the edit field labeled . The specified series will be created in the target page, and will contain the observation or cell identifiers given by the structures associated with the source and the original target pages. Saving the IDs is particularly useful since appending to a workfile removes the existing page structure.
The optional series identifies the source of the observation in the combined workfile: observations in the original target page are assigned the value 0, while observations in the appended portion of the target will be given the value 1.