Creating an Add-in
You can use Add-ins developed by others without ever having to create one yourself. Indeed, many users will never need to go beyond running Add-ins downloaded from the EViews website or other repositories.
You may find, however, that creating your own Add-ins is both useful, if only to add a menu item or assign a one-word command for running your favorite EViews program, and easy-to-do.
Assuming that you already have an EViews program, creating an Add-in requires at most two steps:
• Register the program as an Add-in. Registering an Add-in is the process of defining the Add-in type and assigning menu entry and command keywords to an EViews program.
• (optional) Create an Add-in package for distribution. Bundling your program files into a self-installing package file and providing a program for automatically registering the Add-in means that others can more easily incorporate your Add-in into their EViews environment.
While only the first step is required, you should consider the optional step of creating a self-installing Add-in package if you wish to distribute your Add-ins more widely.
In the remainder of this section we describe the steps required to register an Add-in. In addition, we provide design tips and describe additional programming tools that will aid you in writing sophisticated Add-in programs.
Registering an Add-in
The process of defining the Add-in type and assigning menu entry and command keywords to an EViews program is termed registration. The Add-in registration process may also be used to associate documentation with the Add-in.
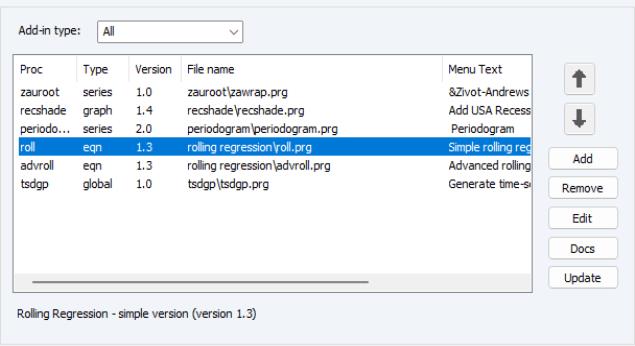
To register an EViews program file as an new Add-in, click on the menu entry in the main EViews menu. The top portion of the management dialog shows the list of currently registered Add-ins:
Click on the button to display a standard file dialog. Navigate to the program file you wish to register and click on to continue.
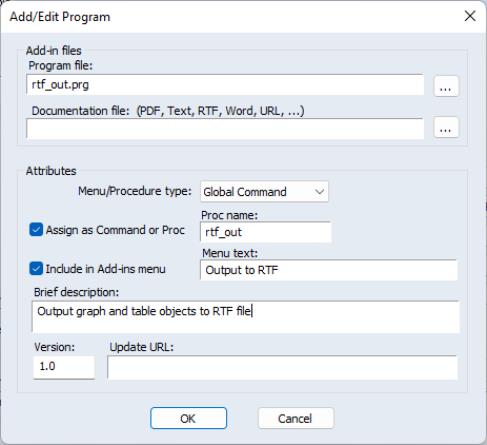
EViews will display the dialog with various default settings.
The dialog allows you to specify a command keyword for the Add-in, to add menu items for point-and-click access to the Add-in, and to attach documentation and descriptions.
• The edit field in the dialog should be used to specify the program to be used as an Add-in. You may enter the name of a file (with an absolute or Add-ins directory relative path, if necessary) or you may click on the button to the right-hand side of the edit field to navigate to the file.
• The edit field allows you specify a PDF, Text, RTF, Microsoft Word file, or URL containing documentation for the Add-in. Note that relative paths are evaluated with respect to the directory of the Add-in program, not the default Add-in directory.
• The dropdown setting determines whether the program is a global or an object specific Add-in. (Recall that global Add-ins are those designed to work with multiple objects or object types, while object-specific Add-ins work with a single object and object type.)
• If you check , EViews will add the specified single-word command or proc keyword to the EViews language, so you may run the Add-in using a global or object command. Names for the keyword must follow standard EViews command naming convention. Global Add-ins should not be given the same name as built-in EViews commands. (See
“Command Masking” below, for additional discussion.)
• If you check , EViews will add the specified to the appropriate menus.
• You may use the edit field to describe the purpose of the Add-in.
• You may enter a number for your Add-in and an indicating where to find the update XML file (see
“XML File Specification”).
In the example above, we instruct EViews to use the file “Rtf_out.PRG”, which is located in the default Add-ins directory, as an Add-in program. We indicate that the program is a global Add-in that may be run from the main EViews menu by selecting the Add-ins menu item or by issuing the command rtf_out. There is no documentation file.
Add-ins Design Issues
For the most part, defining commands and menu items for an Add-ins is straightforward. There are, however, a few issues that you should bear in mind when designing your Add-in.
Command Masking
Allowing you to define user-specified Add-in command names opens up the possibility that an Add-in will be assigned the same command as an existing EViews command, or that multiple Add-in programs will be assigned the same name. Duplicate command names will generate an error or will lead to command masking where some of the instances will be ignored.
• If you specify a global Add-in command name that is identical to an EViews command or a previously defined global Add-in command, EViews will issue an error message, and will display the dialog so you can provide a different name. EViews will not, for example, permit you to register an Add-in with the global command copy since this conflicts with the built-in command.
• EViews will not generate an error message if you provide an object-specific command name that is identical to a built-in command, but the EViews command will mask the user-defined command. EViews will, for example, permit you to register an equation command with the name resid, but if you enter the equation command “eq01.resid”, EViews will display the built-in resid view of equation EQ01, instead of running the user-defined Add-in.
• If you specify an
object-specific Add-in command name that is identical to another
object-specific command, EViews will not error. When multiple Add-ins are assigned the same object-specific command, the first Add-in listed in the list of registered Add-ins will be used and the remainder will be masked. To eliminate masking, you must edit the conflicting Add-in command definitions. If you wish to retain the same command name for multiple Add-ins, you should use the Add-ins management dialog to reorder the Add-ins list so that the desired Add-in has priority (
“Managing Add-ins”).
We emphasize that masking only occurs within like Add-ins. You may have a global, series, and group Add-in that each use the same command without experience masking, but two global Add-ins or two series Add-ins with the same name will lead to masking.
Menu Congestion
While you may define as many Add-in menu items as you like, EViews does place limits on the number of menu items that may be displayed by default. If you have more than 10 global menu entries or more than 10 object-specific menus of a given type, the corresponding menus will display the first 10 entries, along with an 11th menu entry, Clicking on displays a listbox showing the full set of entries. In such circumstances, we recommend that you reorder your Add-ins so that the most used Add-ins are given priority.
Multiple Object Add-ins
You may wish to use a single program file to define Add-ins for several object types. Since it is not possible to use a single Add-in entry to define multiple object-specific types, you must create separate entries for each object-type which point to the single program file. For each relevant object type, select from the main EViews menu, then navigate to and select the program file. Use the dialog to define the object-specific entry.
Creating an Add-in Package
If you are developing Add-ins for use by others, we recommend that you create a self-installing package so that users may easily incorporate your Add-ins in their EViews environment. You can then host your package on a company intranet or perhaps submit your package to be hosted on the EViews.com website for wide distribution.
The process of creating an Add-in package is straightforward, requiring at most two steps:
• (optional) Create a table of contents (TOC) information file and installer program file.
• Create a self-extracting Add-in package file containing the program and support files (including the TOC and installer program file, if available).
The second step, creating the self-extracting package, is trivial. Simply create a standard ZIP archive file containing all of the files for your Add-in, then rename the ZIP file so that it has the extension “AIPZ”. You now have an self-extracting Add-in package file.
Opening a self-extracting package file, either automatically by a browser after completing the download, by double clicking on the file, or by dropping it onto EViews, will prompt you to unpack and copy the files to the location of your choice.
The Add-in will not, however, automatically be installed and registered unless you include a table of contents (TOC) information file and installer program along with your program files. Creating the TOC and installer program files takes only a few minutes and allows you to automate the Add-in installation and allow for automatic updating of your Add-in as you provide newer versions. We strongly recommend that package distributors take the time to create these files as described below.
Table of Contents
First, you should create a table-of-contents file named “Toc.INI” for inclusion in your package. The TOC file should contain setup information which describes the directory in which the Add-in files should be installed, and if appropriate, the name of an EViews installer program for registering the Add-in. The format of the TOC file is:
[package]
installer = <name of installer file>
folder = <name of folder to create>
A TOC file should always begin with the line “[package]”, followed by lines which give the directory and installer information.
The
installer keyword is used to indicate the name of the EViews program file, if one exists, that should be run to register the Add-in (see
“Installer Program”). If, for example, a registration program file named “Recession shade install.PRG” is included in your package, you should include the line
installer = recession shade install.prg
If you include this line in your TOC, EViews will automatically run the installer program when it opens the AIPZ package. If you do not wish to provide an installer program, you should include the line “installer=none” in the TOC file.
The folder keyword may be used to indicate a subfolder of the default Add-ins directory into which you will extract the packaged files. Thus,
folder = RecShade
tells EViews to extract the contents of the AIPZ file into the “RecShade” folder of the Add-ins directory. If no folder is specified, the name of the AIPZ file will be used as the target folder name. Additionally, you may use the special folder name “<addins>” to indicate that the contents of the AIPZ archive should be placed in the main Add-ins directory. (Note, however, that only folders in an AIPZ archive may be written to the main Add-ins directory in this fashion; individual files in AIPZ files must be written into subdirectories.
We emphasize that creating a TOC file and providing an installer program are not required. In the absence of a TOC file or an installer= specification, EViews will, after unpacking the AIPZ files, simply display a message reminding the user that the installed programs may be registered manually using the Add-ins management dialog.
Nevertheless, we strongly recommend that package distributors provide both a TOC file and installation program to facilitate use of their Add-ins. Packages hosted on the EViews website must include both a TOC and an installer.
Installer Program
Next, you should create a simple EViews program that uses the
addin command to register the Add-in with appropriate type, menu, and command settings. Note that the TOC file
installer= specification should point to this installer program.
For example, the graph-specific Add-in described in
“U.S. Recession Graph Shading” may be registered by including the following command in a program file:
addin(type="graph", menu="Add USA Recession Shading", proc="recshade", docs=".\recession shade.txt", desc="Applies US recession shading to a graph object.") ./recshade.prg
The options in this example should be self-explanatory. The command registers the program “./recshade.PRG” as a graph-specific Add-in with menu item “Add USA Recession Shading”, command name “recshade”, and description text “Applied US Recession shading to a graph object”.
See
addin for details and a complete list of options. Use of the following
addin options is highly recommended:
Documentation
We recommend that you provide documentation for your Add-in, and use the “docs=” option to point to the documentation file.
Documentation could be anything from a simple text file with some syntax hints, to a lengthy PDF document that describes the Add-in features in detail.
Version
EViews allows Add-ins to have a version number which allows the users of your Add-in to use automatic updating to ensure they have the latest version of the Add-in. When a user uses the button on the dialog to check for Add-in updates, EViews will compare the hosted version number with the currently registered version number and download the latest version if necessary.
You may use the “version=” option to specify the version number. If omitted, EViews will assume that the Add-in version number is 1.0.
XML File Specification
One of the most useful Add-ins management features is the ability of users to automatically update their installed Add-ins as newer versions become available. To support this feature, EViews must know where to look to determine the most recent version of the Add-in and where to download any updates.
This information is communicated in an XML file, typically located on the Add-ins package hosting site. If you will be hosting this file, you should use the addin option “url=” to specify the URL for the XML file. If this option is not supplied, EViews will look for the XML file on EViews.com.
The XML file should contain one or more item definitions, where each item contains information on a specific Add-in. An item definition is contained in the lines between an <item> and </item> tag. An example of the full specification of an item is as follows:
<item>
<title>BMA</title>
<path>bma\bma.prg</path>
<path>bma\bmamlogit.prg</path>
<version>1.0</version>
<description>Computes different Bayesian Model Averaging methods including LM, GLM and Multinomial Logit models.</description>
<link>http://eviews.com/Addins/BMA.aipz</link>
<pubDate>13 Mar 2012</pubDate>
</item>
Note that the only required specifications are the <title> and <link>.
The <path> specification is used to identify the paths and file names of the main program files used by the Add-in, with the path location specified relative to the Add-ins directory. Automatic updating will update these files when a newer Add-in version is available. If <path> is not specified, EViews will use the <title> specification to determine the relevant Add-in proc name, and use registration information for the proc name to determine the files to update.
When an add-in package has multiple main program files, a <path> statement is required. You should list each file using a separate <path> entry. In the example above, the BMA Add-in has two program files, called “bma.PRG”, and “bmalogit.PRG” that are associated with procs. EViews will update all of the files associated with these procs when updating the Add-in.
The <version> is used to specify the current Add-in version number. When the user checks for updates, EViews will download the updated version if the version number they have currently installed is lower than the one given in the <version> tag.
Finally, the <link> specification contains the URL (or network file location) of the AIPZ file containing the Add-in. This is the location from which EViews will download the updated Add-in package should the user request an update.
The <description> and <pubDate> specifications should be self-explanatory.